
Right place for the right motor!
- Son Luu

- Dec 11, 2018
- 3 min read
Updated: Jan 4, 2019
Yes, last week was all about motor-enabled systems and objects. First, you worry about how to motorize your components using certain types of motor. After your system is proved to work; your motor is now able to turn electrical energy into mechanical motions of your project's components, you realize your motor needs a safe and stable place for it to continue working without falling off, so that it continues to keep everything else in functional order. It is kind of a big deal. One careless or unthoughtful placement of the motor can jeopardize the rest of your mechanical project. This week's assignment asks for any good way to mount these motors and keep them in place because that is critical to the function of a project.
Inspiration
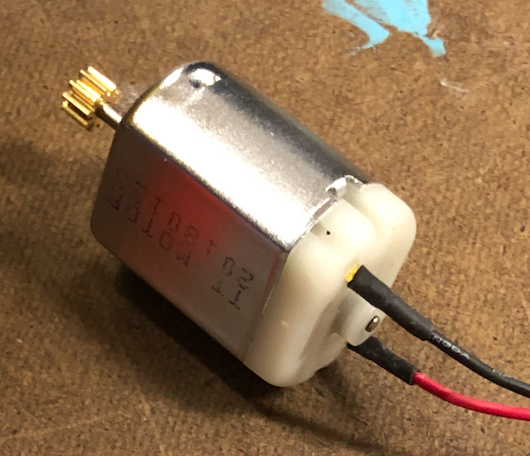
The inspiration came from the motor I own as part of my Arduino Starter Kit. It's such a beauty that has been untouched. I haven't had a chance to create a project using one. So, it's time. I can make something that rotates in circular motion. Who would have thought it was that hard to come up with something cool enough. With other final projects going on, I needed to make something that wouldn't take me a whole weekend. Another option was simply buying something off the shelf which could save a lot of fabrication time.

Materials
This time, I challenged myself to make everything using stuff off the junk shelf on the ITP floor. The shelf is not junk but full of "treasures" remaining from people's completed projects. So many useful parts and components from this shelf have been used to create awesome projects by myself or my classmates.
After spending about 20 minutes looking around, I found some wooden parts, and a metal plate with holes already punched through. This metal plate can easily be fixed into a piece of bracket to tighten the motor into place.


Making Process
Step 1:
Assess how the piece of metal can be used to hold the motor on a surface
I started fitting the motor in between the bracket and top of the wooden stick as it probably made the most sense to me from a first glance.


Step 2:
Mark where I will be drilling to create holes for flat-top nails or screws as fasteners for the bracket.


I picked the 1.8 in bit for drilling the holes because it is about the size of the nails I found and intended to use. After getting the holes drilled, it is time to hammer those nails in. But, I only did it on one side first and wait until I tested my motor's functionality before fixing the nails on the other side.


Step 3:
Now that the motor is mounted, I moved on to assembling other components to be attached to the motor. This part is not my focus, but more for decorative purpose.
After several hours of trying to come up with something cool, I gave up and used electric wires to make a motorized fan.


Final Product
Here it is. It doesn't look very cool, but the process of creating a mounting system for the motor was fun. I am actually very happy with how the bracket turns out, and how the motor ended up on top of the wooden stick in a secured manner.
What I learned from this assignment:
1. I can make a mounting system from scratch although it may be easier to buy one. I would not make one myself if there is time constraint and if the part seems to require a difficult process to make. In addition, making one versus making a large number of something should also taken into consideration.
2. If the mounting system doesn't seem to be easy to dissemble, make sure the fitting for your motor is done appropriately prior to installing permanent fasteners.
3. Flat-top nails or screws are sooo cool when they are used for the right project. I am sure there may be other projects where these flat-top fasteners demonstrate better fit-for-purpose functions, I was happy to find some and use them in my mounting system. I think the system is safer and has a neater look.


Comments